


Before submitting data to the server, It is important to ensure all required form controls are filled out, in the correct format. This is called client-side form validation and helps ensure data submitted matches the requirements set forth in the various form controls.
HTML Validation
Although validation can also be done with HTML attributes like - required, minlength, maxlength, min, max, type, and pattern. The downside of it is that you can't customize it to fit your requirements.
What is Form Validation?
Have you ever tried to sign up on a website where they had certain requirements? Like:
Ensuring your password is between 8 to 30 characters or making sure your password is mixed between letters, numbers, and asterisks.
Or ensure you include the @ for the email input field by popping messages like "Please enter a valid email address".
"This field is required" (You can't leave this field blank)
This is called Validation. When you enter your details on a form website, the browser and/or the web server will check to see that the data is in the correct format and within the constraints set by the application.
Form validation is the process of verifying that the data entered into an HTML form is accurate, complete, and meets the specified criteria before it is submitted to the server.
The application allows the data to be submitted to the server if the information is correctly formatted. If the information is not correctly formatted, it gives the user an error message explaining what needs to be corrected.
Building A Form
Let's build a form webpage in order to solidify our understanding of form validation.
The HTML Code
<div class="formContainer">
        <header>
            <h1>Sign In</h1>
            <a href="test1.html">CHECK</a>
        </header>

        <form id="myForm">
            <div class="formDetails">
                <label for="name">Name:</label>
                <input type="text" id="name" name="name">
                <div class="errorMessage"></div>
            </div>

            <div class="formDetails">
                <label for="email">Email:</label>
                <input type="email" id="email" name="email">
                <div class="errorMessage"></div>
            </div>

            <div class="formDetails">
                <label for="password">Password:</label>
                <input type="password" id="password" name="password">
                <div class="errorMessage"></div>
            </div>

            <div class="formDetails">
                <label for="confirmpassword">Confirm Password:</label>
                <input type="password" id="confirmPassword" name="confirmpassword">
                <div class="errorMessage"></div>
            </div>

            <button id="button" type="submit">Submit</button>
          </form>
    </div>
The HTML code defines a form with four input fields: name, email, password, and confirm password. Each input field is wrapped in a
divelement with a class offormDetails.Below each input field, there is a
divelement with a class oferrorMessage. This is where any error messages related to the corresponding input field will be displayed.The form also has a
submitbutton with an id ofbutton. This button triggers the form submission when clicked.
The CSS Code
*{
    margin: 0;
    padding: 0;
    box-sizing: border-box;
}

body{
    background-color: #021012;
    font-family: sans-serif;
}

.formContainer{
    width: 80%;
    height: 85vh;
    position: absolute;
    left: 50%;
    top: 50%;
    transform: translate(-50%, -50%);
    background-color: #E2F4FD;
}
header{
    text-align: center;
    margin: 2rem 0;
    font-weight: 600;
}

#myForm{
    width: 90%;
    margin: 1rem auto;
}

.formDetails{
    margin: 1rem 0;
}

label{
    display: block;
    font-size: 1rem;
    font-weight: 600;
    margin-bottom: .4rem;
}

input{
    width: 100%;
    padding: .6rem 0;
    outline: none;
    font-size: 1rem;
}

input:focus{
    outline: 1px solid #064247;
}
button{
    margin: 1.1rem 0;
    background-color: #053135;
    color: #fff;
    font-weight: 600;
    border: none;
    padding: .8rem 0;
    width: 100%;
}
.errorMessage{
    margin-top: .3rem;
    font-size: .9rem;
    font-weight: 600;
    font-family: monospace;
}
.formDetails.success input {
    border-color: #09c372;
    outline: none;
  }

  .formDetails.error input {
    border-color: #f2070e;
  }

@media screen and (min-width: 1024px) {
    .formContainer{
        width: 30%;
    }
}
The
.formContainerselector sets thewidthof the form container to80%of the parent element, and theheightto85%of the viewport height, and positions it in the center of the screen usingabsolutepositioning and thetransformproperty -transform: translate(-50%, -50%). The background color is set to a light shade of blue -#021012.The
inputandbuttonselector sets the width to 100% of the parent container, padding to 0.6rem at the top and bottom of theinputselector, outline to none, and font size to1rem. There is also a focus state added to theinputselector that outlines the input with a1px solidborder in a different color.The
.formDetails.success inputselector applies the styles to the input element when the.formDetailscontainer has a class ofsuccess. It sets the border color to a light shade of green and the outline to none.The
.formDetails.error inputselector applies the styles to the input element when the.formDetailscontainer has a class oferror. It sets the border color to a dark shade of red.
@media screen and (min-width: 1024px) {
    .formContainer{
        width: 30%;
    }
}
- The
@mediarule creates a media query that applies styles when the screen width is above 1024px. In this case, the width of the.formContaineris set to 30% of the parent element. This makes the form container smaller when viewed on larger screens.
JavaScript For Validation
- The code listens for the form submission event and prevents the form from submitting by default. It then performs validations on each input field and displays appropriate error messages in the
errorMessage divsand applies thesuccessanderrorclasses to the parentformDetailsdivs based on the validation result.
const myForm = document.getElementById('myForm');
myForm.addEventListener('submit', (event) => {
    event.preventDefault();
}
- For each input field, the code first gets the
inputvalue and trims any whitespace. It then gets the correspondingerrorMessagediv andinputelement using the querySelector method. If theinputvalue is empty, the code sets the error message to a relevant message and applies theerrorclass to the parentformDetails div. If theinputvalue is not empty, the code clears the error message and applies thesuccessclass to the parentformDetailsdiv.
const name = myForm.elements.name.value.trim();
const nameError = document.querySelector('#name + .errorMessage');
const nameInput = document.getElementById('name');
if (name === '') {
    nameError.textContent = 'Name is required.';
      nameInput.parentNode.classList.add('error');
      nameInput.parentNode.classList.remove('success');
    } else {
      nameError.textContent = '';
      nameInput.parentNode.classList.add('success');
      nameInput.parentNode.classList.remove('error');
    }
- For the
email inputfield, the code also checks if the email is in a valid format using a regular expression. If the email is invalid, the code sets the error message to a relevant message and applies theerrorclass to the parentformDetails div.
const email = myForm.elements.email.value.trim();
    const emailError = document.querySelector('#email + .errorMessage');
    const emailInput = document.getElementById('email');
    if (email === '') {
      emailError.textContent = 'Email is required.';
      emailInput.parentNode.classList.add('error');
      emailInput.parentNode.classList.remove('success');
    } else if (!/^[^\s@]+@[^\s@]+\.[^\s@]+$/.test(email)) {
      emailError.textContent = 'Please enter a valid email address.';
      emailInput.parentNode.classList.add('error');
      emailInput.parentNode.classList.remove('success');
    } else {
      emailError.textContent = '';
      emailInput.parentNode.classList.add('success');
      emailInput.parentNode.classList.remove('error');
    }
- For the
password inputfield, the code also checks if the password is at least 8 characters long. If the password is less than 8 characters, the code sets the error message to a relevant message and applies theerrorclass to the parentformDetailsdiv.
const password = myForm.elements.password.value.trim();
    const passwordError = document.querySelector('#password + .errorMessage');
    const passwordInput = document.getElementById('password');
    if (password === '') {
      passwordError.textContent = 'Password is required.';
      passwordInput.parentNode.classList.add('error');
      passwordInput.parentNode.classList.remove('success');
    } else if (password.length < 8) {
      passwordError.textContent = 'Password is expected to be 8 characters.';
      passwordInput.parentNode.classList.add('error');
      passwordInput.parentNode.classList.remove('success');
    } else {
      passwordError.textContent = '';
      passwordInput.parentNode.classList.add('success');
      passwordInput.parentNode.classList.remove('error');
    }
- For the
confirm passwordinput field, the code also checks if the confirm password matches the password. If theconfirmpassword does not match, the code sets the error message to a relevant message and applies theerrorclass to the parentformDetailsdiv.
const confirmPassword = myForm.elements.confirmpassword.value.trim();
    const confirmPasswordError = document.querySelector('#confirmPassword + .errorMessage');
    const confirmPasswordInput = document.getElementById('confirmPassword');
    if (confirmPassword === '') {
      confirmPasswordError.textContent = 'Confirm Password is required.';
      confirmPasswordInput.parentNode.classList.add('error');
      confirmPasswordInput.parentNode.classList.remove('success');
    } else if (confirmPassword !== password) {
      confirmPasswordError.textContent = 'Passwords do not match.';
      confirmPasswordInput.parentNode.classList.add('error');
      confirmPasswordInput.parentNode.classList.remove('success');
    } else {
      confirmPasswordError.textContent = '';
      confirmPasswordInput.parentNode.classList.add('success');
      confirmPasswordInput.parentNode.classList.remove('error');
    }
In the final step, the code checks if there are any error messages displayed. If there are no error messages, the code submits the form. Otherwise, it prevents the form from submitting.
  if (nameError.textContent === '' && emailError.textContent === '' && passwordError.textContent === '' && confirmPasswordError.textContent === '') {
        myForm.submit();
      }
    });
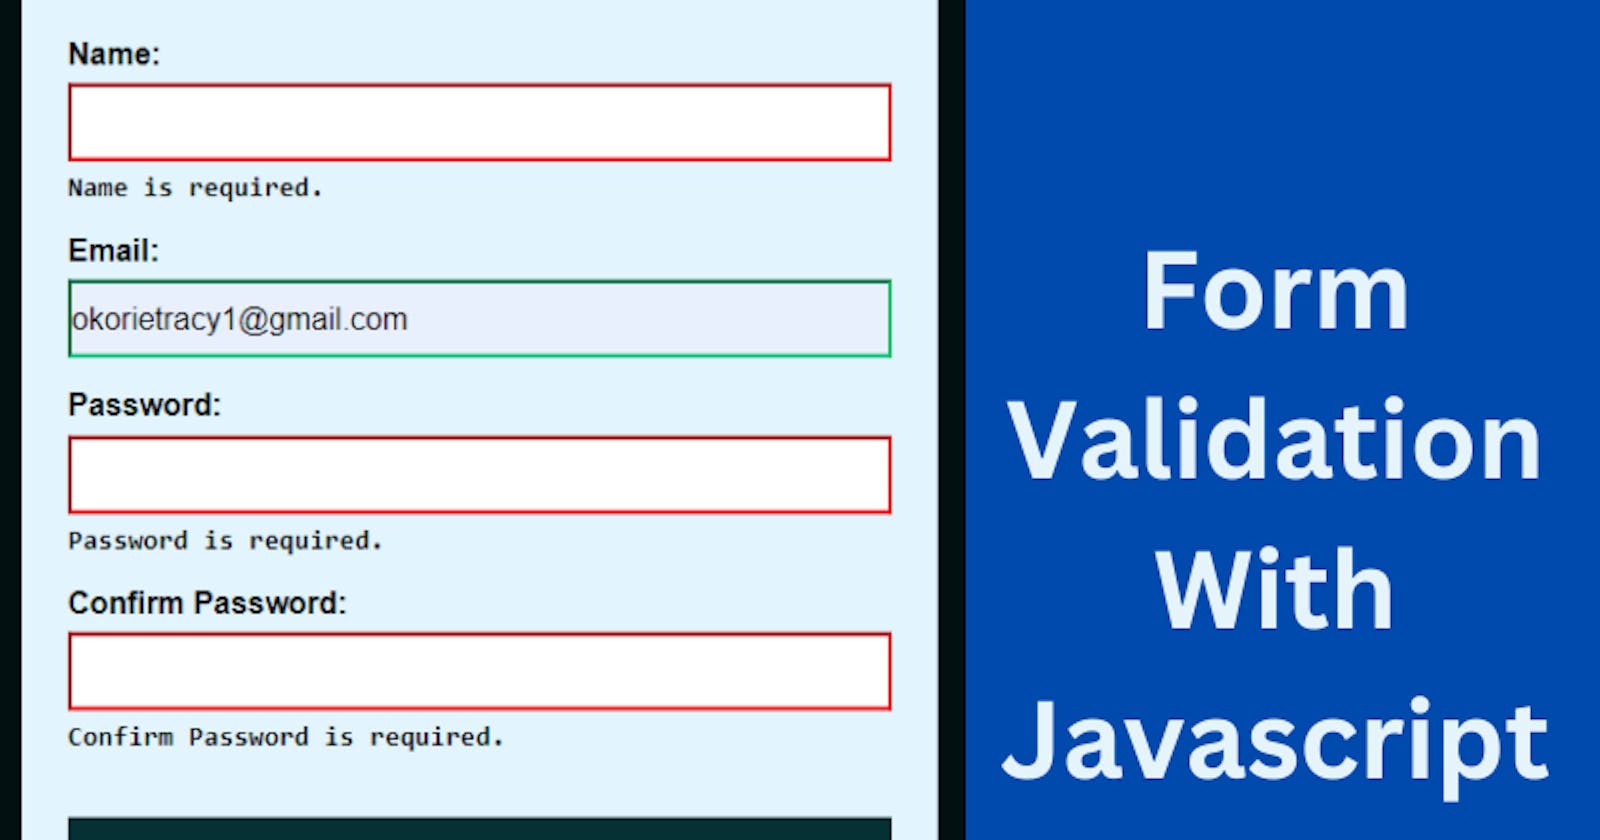
The Final Result
If you found this article helpful, please ensure you follow for more helpful posts. I would also appreciate your ideas on what you would be interested in learning,